


How to remove dash cam mount from windshield: Safe & Easy Guide
|
|
Time to read 8 min

Help Center
Get help with setup, updates, and information

Track My Order
Check Your Package Tracking Status Online

Learn About Dash Cam
The Latest Dash Cam News and Information

Redtiger Player
Play the videos you've recorded on your PC

REDTIGER CAM APP
Download the Redtiger app and use it via a Wi-Fi connection
We provide comprehensive pre-sales and after-sales service.

Redtiger offers free shipping on orders totaling $50 or more. We recommend purchasing shipping protection to safeguard your package and money.

Redtiger offers a 30-day money-back guarantee. You may contact us for a no-questions-asked return within 30 days of receiving your order.

Ordering a dashcam through the Redtiger official website entitles you to an additional 6-month extended warranty. This brings the total warranty period to 24 months.

Redtiger provides 24/7 customer service. You can contact us via email or call our customer service hotline directly.
No need to worry about after-sales service—we provide comprehensive after-sales support.
We offer free shipping on qualifying orders with no hidden fees or surprise charges.
Most orders are processed within 1–2 business days and shipped through trusted carriers to ensure safe and timely delivery.
You’ll receive tracking details as soon as your order ships, so you can follow it every step of the way.
From checkout to delivery, we make the process simple and worry-free.

Your satisfaction comes first. If you’re not completely happy with your purchase, you can request a return within 30 days of delivery.
Simply reach out to our support team and we’ll guide you through the process.
Once your item is received and inspected, your refund will be issued promptly according to our policy.
Shop with confidence knowing your purchase is protected.

We use industry-standard encryption and trusted payment providers to protect every transaction.
Your personal and payment information is securely processed and never stored or shared without authorization.
Multiple secure payment options are available for your convenience, so you can complete your purchase with total confidence.

Have a question? We’re here to help.
Our dedicated customer support team responds quickly and provides clear, helpful solutions — whether it’s product guidance, order updates, or after-sales support.
We’re committed to delivering a smooth experience before and after your purchase.
|
|
Time to read 8 min
If you are wondering how to remove dash cam mount from windshield without causing damage, you are in the right place. Removing your dash cam mount is all about knowing which type you have in your car. Some mounts use a suction cup, some use an adhesive pad, and others use a static film to stick to your glass.
Table of contents
Before you start, it is important to know exactly what type of mount your dash cam uses. You need to look at how your camera connects to your windshield.
To safely learn how to remove dash cam mount from windshield, you want to gather the right tools before you start.
Removing a suction cup dash cam mount is usually very simple. When you have this type of base, you do not need much force or effort.
You must locate the small lever on the base of your mount. Pull this lever up or push it down to break the main vacuum seal. Some mounts feature a small rubber tab instead of a lever. You must pull this tab to let air under the rubber cup. You will hear a small pop when the air enters.
You can now pull the base away from the glass. You must pull with a gentle force. Do not yank the device hard. If the rubber feels stuck, you can wiggle it side to side. The rubber might feel stiff in cold weather. You can turn on your car heater to warm the rubber first.
You might see a round smudge on your window after you detach the device. You should use a glass cleaner and a microfiber cloth to wipe the spot. Wipe the area until the glass looks perfectly clear. You highlight that suction mounts detach with minimal effort. You can now store your Redtiger camera safely.
When you have an adhesive dash cam mount, it can be tricky to take off because the sticky foam tape holds on tightly to your glass.
You must use a hair dryer to soften the glue for easier removal. Turn the dryer to a medium heat setting. Point the warm air at the outside of the glass right behind the mount. Move the dryer back and forth for a full minute. The heat transfers through the glass to melt the glue bond.
You need to slide dental floss or a plastic tool behind the mount. Move the floss in a back-and-forth motion like a saw. You will slice through the thick foam tape. You must keep the floss tight as you pull it downward. A plastic card works well to pry the edges gently.
You must apply steady pressure to pull the base away from the glass. You must avoid a sudden force to prevent glass damage. Wiggle the base left and right to stretch the remaining glue. If the base feels too tight, you must apply more heat with your dryer. Never use a metal tool to pry it.
You will see sticky residue on your car window. You need to use an adhesive remover or alcohol to clean the leftover glue. Spray the liquid onto a cloth first. Press the cloth against the glue to soak it. Rub the area until the glass feels perfectly smooth.
You don't want any sticky glue or marks on your windshield after you take off your dash cam mount. Taking off the mount is just as important as cleaning up the last bits of glue or marks.
You should put regular rubbing alcohol on your soft cloth. You need to rub the sticky spots in small areas. The light glue marks come off quickly with the alcohol. To get the dirt off the glass, you have to rub it in a circle.
You might find spots of glue that are very hard. For these tough stains, you should use a chemical remover that is made just for them. You need to try the chemical in a small area first. Put on the liquid and let it sit for two minutes. Use your cloth to wipe away the melted glue.
You will notice an oily haze left behind by the chemical removers. You must spray a standard glass cleaner on the window to fix this. Wipe the area until the glass sparkles. You must use extra caution on aftermarket window tint and defroster lines.
If you want a more detailed step-by-step guide on safely removing dash cam mounts and stickers without damaging your windshield, you can read this guide: How to Take Off Dash Cam Sticker
Your dash cam might come with a static sticker mount. This method doesn't leave any sticky mess on your glass, as you can see.
You need to find the edge of the clear film on your glass. Use your fingernail to lift this little edge. You need to slowly pull the film back. The whole sheet will come off the glass easily. There won't be any sticky mess on your window.
Yes, you can use this static film again later. If you still have the protective covers, you need to keep them. You should keep the film clean and dust-free. Use plain water to wash it and then let it dry in the air.
Sometimes, you might run into problems while working on your dash cam mount.
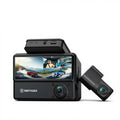
You have finished the removal process. Since you know how to remove the dash cam mount from the windshield, you are ready to install your Redtiger camera again.
You now understand the step-by-step process for taking off your dash cam mount in a safe and easy way. By following these instructions, you protect your windshield and window tint and avoid any sticky mess left behind. These simple actions mean you can reinstall your Redtiger dash cam whenever you want and you will always feel confident about caring for your car.

