


How to Install Redtiger F7NP Dash Cam: Step-by-Step Guides
|
|
Time to read 6 min

Help Center
Get help with setup, updates, and information

Track My Order
Check Your Package Tracking Status Online

Learn About Dash Cam
The Latest Dash Cam News and Information

Redtiger Player
Play the videos you've recorded on your PC

REDTIGER CAM APP
Download the Redtiger app and use it via a Wi-Fi connection
We provide comprehensive pre-sales and after-sales service.

Redtiger offers free shipping on orders totaling $50 or more. We recommend purchasing shipping protection to safeguard your package and money.

Redtiger offers a 30-day money-back guarantee. You may contact us for a no-questions-asked return within 30 days of receiving your order.

Ordering a dashcam through the Redtiger official website entitles you to an additional 6-month extended warranty. This brings the total warranty period to 24 months.

Redtiger provides 24/7 customer service. You can contact us via email or call our customer service hotline directly.
No need to worry about after-sales service—we provide comprehensive after-sales support.
We offer free shipping on qualifying orders with no hidden fees or surprise charges.
Most orders are processed within 1–2 business days and shipped through trusted carriers to ensure safe and timely delivery.
You’ll receive tracking details as soon as your order ships, so you can follow it every step of the way.
From checkout to delivery, we make the process simple and worry-free.

Your satisfaction comes first. If you’re not completely happy with your purchase, you can request a return within 30 days of delivery.
Simply reach out to our support team and we’ll guide you through the process.
Once your item is received and inspected, your refund will be issued promptly according to our policy.
Shop with confidence knowing your purchase is protected.

We use industry-standard encryption and trusted payment providers to protect every transaction.
Your personal and payment information is securely processed and never stored or shared without authorization.
Multiple secure payment options are available for your convenience, so you can complete your purchase with total confidence.

Have a question? We’re here to help.
Our dedicated customer support team responds quickly and provides clear, helpful solutions — whether it’s product guidance, order updates, or after-sales support.
We’re committed to delivering a smooth experience before and after your purchase.
|
|
Time to read 6 min
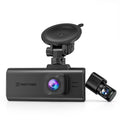
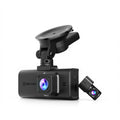
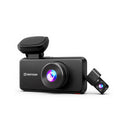
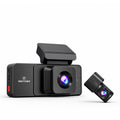
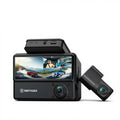
The Redtiger F7NP dash cam is a very good camera that you can use to record your rides. It has many features that can help you record your drives. This guide will show you how to install it in your car and give you some helpful instructions to keep it good for a long time.
The Redtiger F7NP dash cam is a dual-channel dash cam. It can record video from both the front and rear of your car. This will give you coverage of the whole road in high resolution.The front camera can record up to 4K (exported video files with a resolution of no less than 3840×2160). The rear camera also records in 1080p to give you clear video.
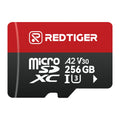
RedTiger F7NP also has a night vision that is important for driving at night. The F7NP has a wide viewing angle that lets you capture much more on the road. It is very easy to install this camera and this guide will show you how. The F7NP comes with a 32GB memory card. Redtiger also offers other microSD cards you can purchase.
Specification |
Value |
Screen Size |
3.18" IPS Screen |
Video Format |
MP4 |
Photo Format |
JPG |
Input |
DC 5V-2.5A |
Lens |
Front cam F1.55, Rear camera F2.05 |
Operating Temperature |
-4°F~158°F |
Memory Card |
32GB-256GB |
Warranty Period |
1 Year |
Different resolutions of the Redtiger F7NP are
Recording Mode |
Resolution |
Frame Rate |
Front Only |
2160P (4k) |
30fps |
Front Only |
1440P (2.5k) |
60fps |
Front Only |
1080P |
120fps |
Front & Rear |
2160P + 1080P |
|
Front & Rear |
1440P + 1080P |
"4K" refers to exported video files with a resolution of no less than 3840 × 2160.
Night Vision: The F7NP has night vision that can help you record clear video in low light. This is important to record everything in detail even when it is dark. It will also allow you to record clear video in poor lighting areas. It can also improve the visibility in dark environments.
Dual Channel Recording: The F7NP has two cameras to record from both the front and back of your car. This will let your car get complete coverage and record what happens in front of you and behind you. This will improve your car protection and make sure you capture all important events.
High Resolution Recording: The F7NP cam can record in very high resolution. The front camera can record up to 4K, which refers to exported video files with a resolution of no less than 3840×2160, and the rear camera records in 1080p. This ensures you have a clear video to capture important details, providing sharp and detailed footage.
Wide Viewing Angle: The F7NP has a wide viewing angle. This lets you capture more of the road. You can see more of what is happening around you. This helps you record a wider field of view. It increases the area covered by the camera.
Loop Recording: The F7NP uses loop recording which means that when the memory card is full, it will overwrite the video file over the oldest video. You will not have to worry about running out of space because it overwrites old footage by itself to give you continuous recording.
G-Sensor: The F7NP also has a G-sensor that can tell when there is an impact. When this happens, the dash cam will save the video. This is important for keeping evidence as it can detect collisions and protect much needed recordings.
Parking Mode: The F7NP has a parking mode which lets the dash cam record even when your car is turned off. It can use motion detection to start recording when it sees something near your car. This can help you record if someone hits your car when it is parked. It provides security as it will monitor your car when you are away.
Wi-Fi Connectivity: The F7NP also comes with Wi-Fi that lets you connect your dash cam to phone. You can then see the videos on your phone. This is helpful for viewing or sharing videos as it allows for easy access to your recordings by giving you easy file transfer.
Clean the Windshield: You should first clean your windshield where you will attach the dash cam. Make sure it is clean so the mount can stick well. This will help the suction cup to attach properly without falling. You can also use a glass cleaner for the best results.
Attach the Mount: You can now attach the suction cup mount to the windshield. Make sure it is secure and press it firmly against the glass so it is properly attached.
Adjust the Angle: Adjust the angle of the camera so it records the road in front of you. Make sure it has a clear view.
Clean the Rear Windshield: Clean the spot on your rear windshield where you will put the rear camera. Make sure it is clean. This will help the camera stick. Wipe the area thoroughly.
Attach the Electrostatic Sticker: Put the electrostatic sticker on the rear windshield. This will help the camera adhere. Apply it carefully.
Attach the Rear Camera: Attach the rear camera to the electrostatic sticker. Make sure it is securely attached. Press it firmly into place.
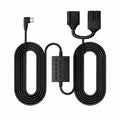
Access the Fuse Box: Find the fuse box in your car. It is often on the passenger side. Pull outward on the tab. Push up and out to remove the fuse cover. Pull up on the trim near the sill plate. Remove the rest of the fuse box cover. This will give you access to the fuses.
Identify the Fuse Slots: Find the fuse slots that you will use to connect the dash cam. You will need one that is always on and one that is only on when the car is running. Slot 31 is always on (constant power). Slot 29 is only active with ignition. Consult your car's manual if needed.
Connect the Hardwiring Kit:
Connect the wires from the hardwiring kit to the fuse slots.
Remove the fuses from slots 29 and 31.
Place them onto the kit’s yellow and red hardwire slots
Yellow Cable (Constant Power) → Fuse Slot 31.
Red Cable (Ignition Power) → Fuse Slot 29.
Ground Cable (Flat Cable): Secure it to a metal ground point.
Make sure the connections are secure.
Test the Dash Cam: Plug in the dash cam to make sure it is working. Check that it powers on correctly.
Cable Management: Tuck the wires neatly so they are not in the way. The plastic cover is flexible. You can lift it slightly and insert the cables. This will create a clean installation.
Turn On the Dash Cam's Wi-Fi: Turn on the Wi-Fi on your dash cam. You can usually do this through the settings menu.
Connect Your Phone to the Dash Cam's Wi-Fi: Go to the Wi-Fi settings on your phone and connect to the dash cam's Wi-Fi network. Enter the password if prompted.
Open the Redtiger App: Open the Redtiger app on your phone. Make sure you have the app installed.
Connect in the App: Follow the instructions in the app to connect to your dash cam. This usually involves selecting the dash cam from a list of devices.
No GPS Signal: Move to an open area. Clean the cable and port. Check for anything blocking the signal. Ensure that the GPS mount is properly attached.
Dash Cam Restarts Repeatedly: Use the original charger. Reset the device. Update the firmware. Check the power connections.
Card Error: Format the memory card. Reset settings. Update firmware. Try a different microSD card.
Wi-Fi Connection Issues: Stay close to the dash cam. Check the Wi-Fi name and password. Turn off mobile data, VPN and security apps. Restart both the dash cam and your phone.